
3DMakerPro Moose 3D scanner review
This brand new 3dscanner from 3dmakerpro just released and I had the pleasure of using it a few weeks before it was launched.
In my review in the video above you’ll get all the juicy details and my oppinons about this Moose Lite 3D scanner. This being one of the cheapest 3D scanners out there, I’m sure you’re also interested in seeing the current early bird pricing (aff-link): https://geni.us/Moose3Dscan. And you can get some extra discount ising my discount code ($15): 3DPT15 - If it stops working, let me know!
Moose and Moose Lite 3D Scanner technical specifications
As always things like resolution and accuracy arn’t set in stone with the technical specs. These are best-case-values and should be very carefully regarded as marketing numbers, not real data. See the review and more info further down for more clarifications.
In this 3D scanner buying-guide I try to explain a bunch more.
Moose Lite 3D scanner (My Review unit)
Technology: Near infrared Light
Accuracy*: 0,05mm Single frame accuracy
Resolution: 0.1mm Point distance in mesh
Color Texture: None (greyscale)
Weight: 250g
Scan depth: 100mm
Typical object size**: 15-1500mm
Connectivity: USB-C
Moose 3D Scanner
Technology: Blue imaging system (projected light)
Accuracy*: 0,03mm Single frame accuracy
Resolution: 0.07mm Point distance in mesh
Color Texture: 24-bit Texture color
Weight: 280g
Scan depth: 100mm
Typical object size**: 15-1500mm
Connectivity: USB-C
*The accuracy is based on 1 single image. The scanner does several images per second and for each image added, accuracy decreases as there is a tiny mismatch when tracking each frame towards each other.
**Typical object size in my tests are more like 50-500mm, which is a more realistic expectation. It’s possible the Blue Light Imaging system on the premium Moose 3D scanner tracks better and works better on larger objects.

Top/bak view of the Moose scanner. LED indicator visible.

Standard camera thread for tripod mounting and a USB-C connector.
The Moose 3D scanner concept
The Moose 3D Scanner reuses the SEAL casing and design. What’s confusing is that the premium version have a new light projection with blue light instead of near infrared light. This should in theory be a bit sharper and perform better, which is seems to do on people particularly, compared to my tests.
The Lite version is probably “leftovers” from the SEAL or other scanners that they could push the prices on, and we end up with a very cheap entry level 3D scanner, that probably isn’t as good as the “premium” version.
For anyone just trying to get into 3D scanning, I think the Lite is a clever way from 3Dmakerpro to just get people to buy it and try. When something is priced under $299 and has a good resell-value, it’s a great way for people to just buy and try instead of “invest”.
What do you get by going cheap?
Well, actually quite a lot. 3DMakerPro scanners have included software (JMstudio) and it’s quite fast and efficient to use. However it does lack a few tools found in the professional software competitors, features like single-hole filling, spot-healing/defeatures and just more parameters to adjust settings like filtration, hole filling and such.
The software for 3DMakerPro is made more to align several scans (which it does very well) and quickly get you a watertight model. Even if you don’t want a watertight model… You can turn of the hole filling, but then it’s very noisy and you end up with a lot of micro-holes.
For best result, editing in a third party software is recommended.
What can you use 3DMakerPro moose 3D scanner for?
Since the post-processing of scans isn’t flawless, I’d like to recommend this as a scanner for anyone who has a 3D printer or does design work, and needs reference surfaces now and then. It’s very quickl to just point at a surface, capture enough of it so that you can 3D-model around the scanned data in your CAD program.
However, you will very seldom do a 100% scan and use it to print a copy. mirror it or etc. You should expect to 3D-model a new model of what you’re capturing. Mostly because you often can’t reach 100% of the object to just “copy” it. And you often end up with defects, specially around sharp corners that are easer to 3D-model than to “repair” on a scan.
A finished scan with good results and coverage. Hole filled and noise reduction.
Should you buy the Moose 3D Scanner?
Since I’ve just tried the Moose Lite 3D Scanner from 3DmakerPro I may have a different experience than the regular Moose which has a different scanning technology. This means that I might have worse results (or better, but i doubt it).
So if you’re just looking to play around with 3D scanning on objects from 50-500mm, I’m pretty sure this is one of the cheapest options out there right now (Moose lite).
The results are mixed, but in general good enough for most applications that involves 3D printing. But you have to be aware that the finished model often needs a remodelling, where you actually draw sharp corners and round holes where you need them. So a scanner without knowing some level of CAD can be tricky in terms of expectations!
Hello, World!
MOOSE vs MOLE 3D scanners
3DMakerPro compares the MOOSE(full version) to the MOLE and it shows some interesting results. This section is not my own test, but comments on the tests provided by 3DMakerPro.

In this example the MOOSE is better at detecting edges and sharper details. Even looking outside of the red areas (which shows black areas of the shoe) there are some visible changes in sharpness on features. There also seems to have been more noise around the shoelace on the MOLE due to the black areas.

In this example you can also see how the MOOSE handles complex repetitive patters a bit better.
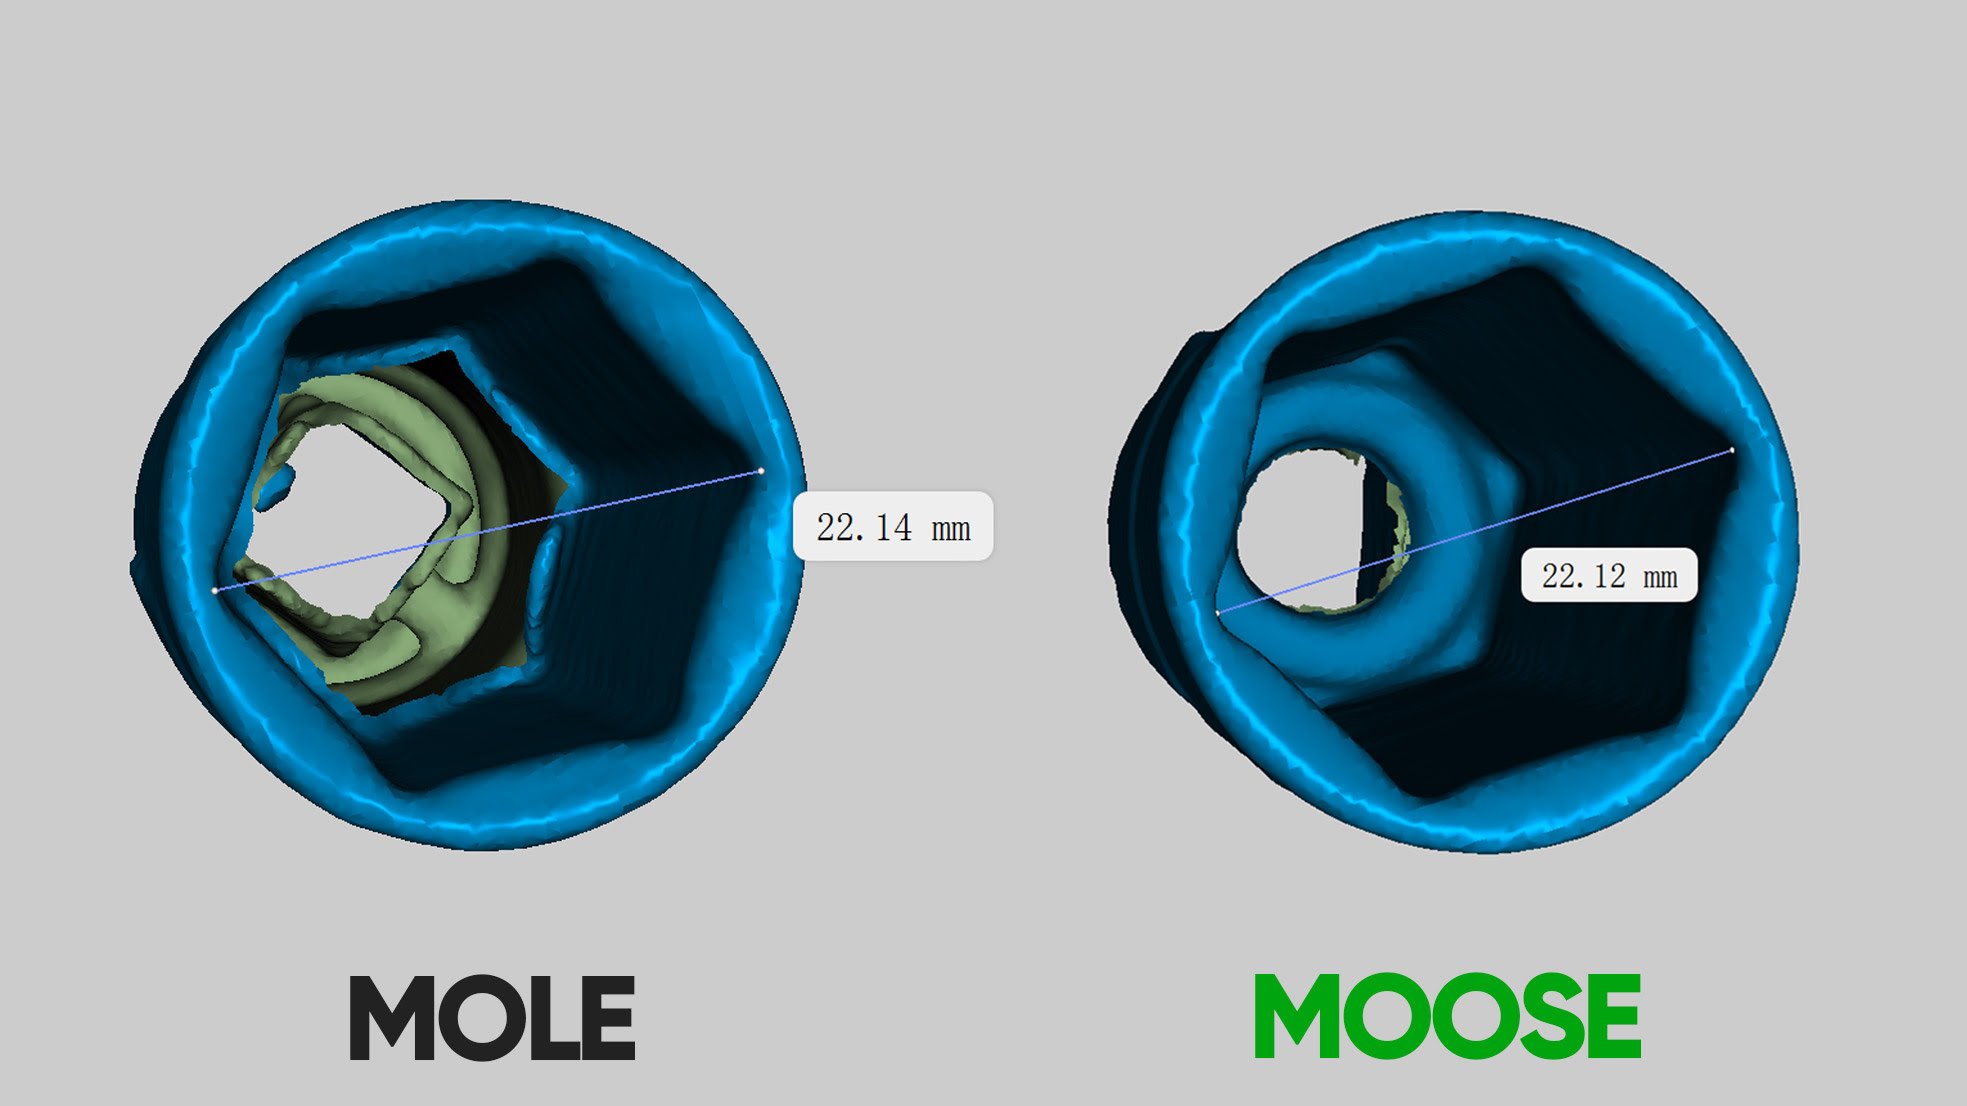
Another example of the differences is how the MOOSE reaches deeper into smaller holes and crevasses, meaning it can detect and generate surfaces deeper inside holes like this socket for example. The accuracy difference of 0.02mm isn’t very special, and can just be a way of how you measure and how the sharp edges are designed. If they measured the flat walls of the socket against each other, it would probably not be any deviation.
In conclusion the MOOSE is better than MOLE. But this is the “pro” MOOSE with blue light, not the Lite that I reviewed, so you’re paying a little more. See the current price of the MOOSE (pro) through my link here.