
Flashforge Adventurer 5M Pro Unboxing
I finally got my hands on the new Flashforge 3D Adventurer 5M Pro Printer
This Pro version of the Adventurer 5M looks incredible promising. Let’s unbox it, see what we get and then run a first couple of prints. All is covered in the video above if you haven’t already seen it.
A printer ready to go
The Flashforge adventurer 5M Pro comes pre-assembled and ready to go. All we have to do is to get it out of the box, remove the protective plastics and the 6-very-important-screws from the build plate and we’re ready to go!
A quick comment on the packaging material is that they are reinforcing all the corners, making the boxes extra sturdy and probably better to stack inside containers or in warehouses.
For full specs I suggest to go to the Flashforge Adventurer 5M Pro live product page (latest info, aff-link) or just read my before-I-got-a-review-sample-article here.

Inside the box
We get everything we need to get going. A local power cable and a 250g small sample of the High Speed PLA filament from Flashforge.
The accessory box includes tools, grease, filament holder and even a complete nozzle kit. Which is fantastic. This is an 0,6mm quick-swap nozzle kit and everyone who buys a 5M pro appears to get one.
Although a proprietary solution, this quick-swap nozzle is better than many of the competition thanks to how easy it is to swap. It’s very similar to the Adventurer 3 and 4 series nozzle/hot end, but they don’t seem to be compatible across models.
Also included is build plate glue from Flashforge together with USB-stick to transfer prints if you don’t want to connect the printer to LAN or Wifi.


Great start up procedure
Although the start up time felt a bit slow, the first startup goes directly into first start mode. You’re promted with language and then the machine asks if you’ve removed the screws and are ready to calibrate.
This calibration is thorough and automatic. The levelling is followed by a vibration dampening procedure which is quite impressive.
The machine runs itself through all the frequensiies to detect how it vibrates, and can compensate for that, pretty impressive!

The timer says 3:45 remaining, but image was taken after a while. Whole calibration took around 8 minutes.
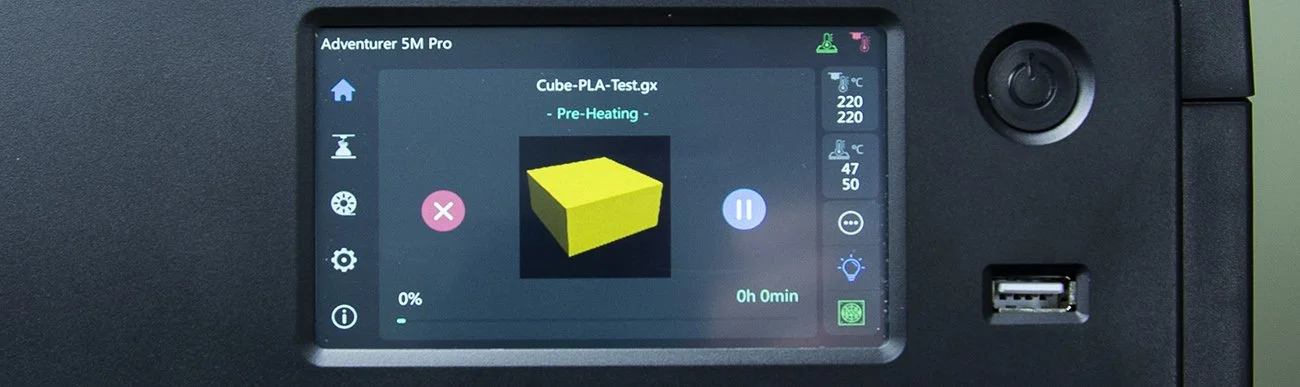
Technically the first print
This test cube is the first actual test when you’ve loaded filament for the first time. It’s a demonstration in how fast the machine is, because it just take a minute or so after the hotend and bed is hot enough.
I love the layout of the touch screen. I’ll go through it fully in my review, but it’s a great overview and you have access to tons of data in the submenus.
The 3d Benchy.
I then sliced a 3D benchy using default everything in the Flashprint 5 software. We’ll be using more of Orca slicer later, as this printer is well supported in there. But for now, let’s get the “vanilla experience”.
This benchy took 24 minutes to print. and looks more than decent. It’s not perfect and I think the HS-material might just be a bit moist. Some say this stringing is comming in flashforges that are enclosed, but I had mine open.
As mentioned in the youtube video, my first attempt actually failed. It got loose from the buildplate. Which is wierd with glue, auto levelling and standard settings using 50c on the build plate. This PEI-sheet should handle that, even without glue, PLA should stick?
I’ll have to investigate the build plate. maybe I have it upside down ;).

This type of stringing isn’t pretty. but it’s extremely easy to remove with a lighter and 0,1 second heat. Hopefully different materials don’t string like this. Click on the image to zoom.
The Second real 3D Print
Is the Oscars statue. I wanted to see how it printed smal cross section fast with max cooling. It turned out pretty much fantastic. Around 24 minutes for this 120mm model as well.
Quality looks fantastic, but the seam is quite vissible on the back. This could possible be better in Orca slicer, or I’m fairly sure it is better. We’ll have to investigate in the upcoming review.
What’s next for the Adventurer 5M Pro
Now I’ll test this machine during a couple of weeks, to really see what it can do. I need your help with ideas and examples you’re curious about!
Between filming and writing this article, I’ve been playing around with ABS and orca slicers, as well as investigate how the interior/exterior cooling works. There seems to be a temperature sensor for the chamber, so can I use it to control and maintain a certain temperature? If so, then is this a great competitior to the X1E that bambu labs just released?
Time will tell. reach out or comment the youtube video if you want me to try something extra, or just vote for what you want me to prioritize.
Make sure to look in on Facebook and Twitt…I mean X on my updates before the review.
See current price here(aff-link): https://geni.us/Adventurer5Mpro (use code "SA5MP" gets you $30 off standard price)
The Adventurer 5M (non pro) is $20 off using "SA5M" code on it’s original price and this affiliate link: https://geni.us/Adventurer5M